In this guide
What is pulsing?
Pulsed MIG alternates between a higher current and a lower background current. In a suitable programme, the peak supports controlled droplet transfer while the background maintains the arc. This differs from simply turning the average current down.
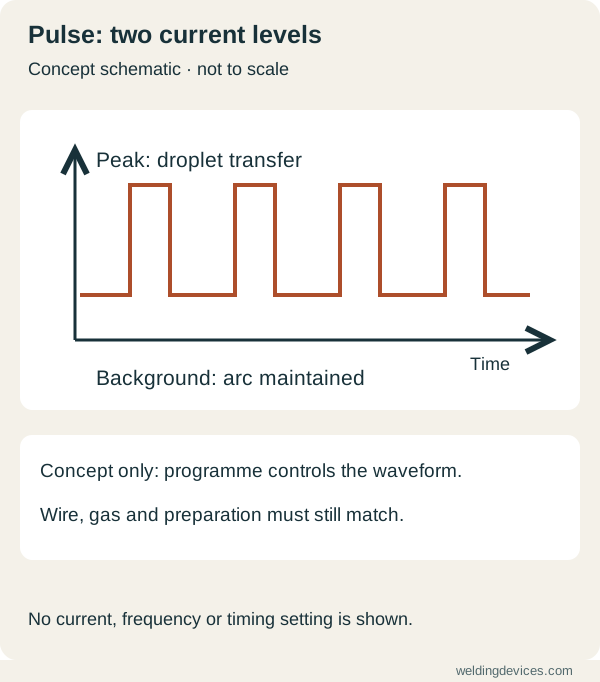
Schematic; source.
Where it can help
For appropriate aluminium applications, pulsed MIG can offer control of heat input, bead profile and transfer. Some systems also manage starts and stops to improve fusion at the start and fill the end crater. Available functions vary by power source and programme.
What pulse cannot fix
Pulse does not replace oxide removal, reliable wire feeding, fit-up or the right gas. A programme selected for the wrong wire or gas may give disappointing results even if the display looks convincing.
Workshop example
If you repeatedly make the same aluminium bracket, ask for a comparison using your own joint. Record setup time, distortion, rework and whether starts and stops are acceptable. Keep material, filler and geometry consistent so the comparison tells you something useful.
Questions before buying
- Does the machine include a pulse programme for your wire, diameter and gas?
- Are the required torch and wire-feeding accessories included?
- Can you make controlled adjustments around the programme?
- Will a supplier support a trial on your actual parts?
Pulse is a capability to evaluate against a task. It is not a promise that every weld will need less finishing or that every operator will immediately work faster.
Separate the feature from the programme
A machine advertising pulse may offer several programmes, each intended for a particular combination of material, wire and shielding gas. Before using one, identify the exact combination in the documentation. A familiar programme name on another manufacturer's display is not evidence that the settings or adjustment scale mean the same thing. Keep the manual open beside the machine during your first supervised setup.
Ask what the main adjustment changes and what remains linked automatically. Some interfaces present a material thickness or wire-feed value, while other controls modify the arc around that baseline. Write down the programme and adjustments used for the demonstration. That record gives you a starting point for a repeat trial and avoids the vague instruction to turn pulse on until the bead looks better.
Make the comparison fair
Use equivalent coupons, preparation and joint geometry when comparing a conventional mode with pulse. Begin with an application that both configurations can reasonably support. Let the supplier or trainer choose the appropriate documented setup for each. A comparison between one well-tuned programme and one deliberately poor setup does not answer whether the extra capability is useful.
Record what you can actually observe: time spent setting up, feeding interruptions, access, spatter cleanup and consistency between samples. Agree how joint quality will be assessed. If inspection identifies a problem, include the correction time. Your purchasing decision should rest on the complete result, rather than a dramatic arc sound or a particularly attractive coupon selected from a larger group.
Operator movement still matters
Pulse changes the electrical behaviour of the arc; it does not hold the gun for you. Practise keeping the gun position and travel steady using the selected procedure. A changing contact-tip-to-work distance or awkward stance adds variation that can obscure the effect of a machine adjustment. Reposition the practice coupon when safe and permitted so that you can see the joint comfortably.
Start with a short straight exercise, then discuss a corner or restart with your instructor. Do not introduce a wide weave simply because it looks impressive in a video. Choose movement for the joint and procedure. The MIG technique guide gives a sequence for learning gun control before exploring more complicated programme choices.
Budget for the system around pulse
Check the torch, feeding arrangement, supported wire diameters and electrical supply alongside the power source. For aluminium work, a demonstration may use a feeding accessory that changes the package cost substantially. Confirm which gas and consumables are required. Ask whether software options or specialist programmes are included, and what local service can support the complete configuration.
Consider your likely work pattern. A professional repeating a difficult joint may value a capability differently from someone making occasional steel brackets. Estimate the number of relevant jobs rather than assuming every weld benefits equally. Use the ownership cost calculator to compare actual packages. Leave unsupported productivity savings out of the calculation until a representative trial gives you evidence.
Keep a small trial report
Give each sample an identifier and record the date, material, joint, programme, consumables and result. Note which changes came from the supplier and which came from the operator. If a second person repeats the trial, compare consistency and setup effort. That helps distinguish a useful capability from a result dependent on one unusually skilled demonstrator.
End the report with three decisions: whether the process supports the application, which practical benefit was observed, and what remains unresolved. Ask for further testing where the answer is uncertain. Pulse is worth paying for when it solves a relevant problem within a suitable procedure. An extra control on the display has little value if it never appears in the work you actually intend to do.
Put the choice in context.
Try the welding process finder to narrow your equipment research, or compare a complete setup in the ownership cost calculator.
References
Open the publisher’s page. If a new tab fails, use “Open directly” or copy the address into your browser.
- Miller — Pulsed MIG welding on aluminium · sourceOpens the source in a new tabmillerwelds.comLink checked · 31 Oct
- Miller — Advanced aluminium welding techniquesOpens the source in a new tabmillerwelds.comLink checked · 31 Oct