
In this guide
Give each movement a name
Travel speed describes progress along the joint. Work angle describes orientation across it. Travel angle describes inclination along the path. Electrode extension and arc length describe additional process-specific distances. These variables can change together without you noticing, especially when a clamp blocks access or your hand reaches an uncomfortable position.
The aim of this lesson is to identify and practise one movement at a time. Use a suitable supervised exercise, the selected procedure and exact equipment instructions. The reference movement for one MIG joint is not a universal technique for TIG, stick or flux-cored wire. Keep the process and joint attached to every observation.
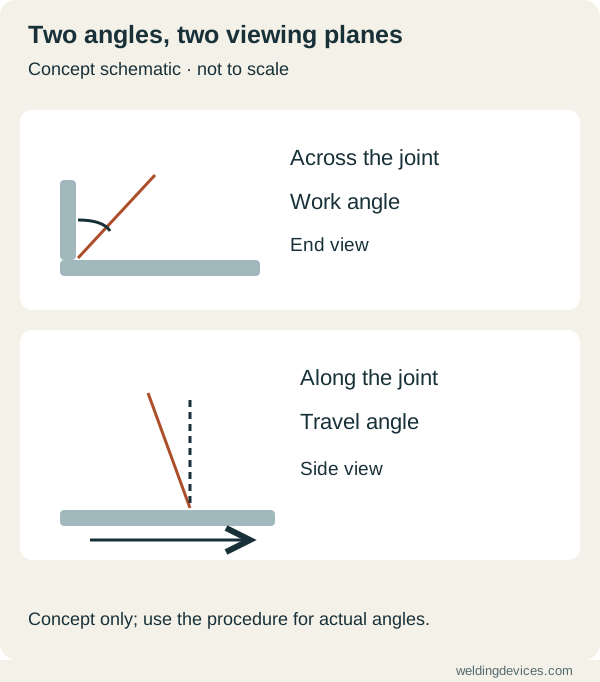
Schematic; source.
Rehearse before striking the arc
With the machine safely isolated, move the torch or holder through the intended path. Keep the selected angles and distance as consistent as practical. Watch how your wrist, elbow and cable position change. If the position deteriorates halfway along, arrange a shorter exercise or improve the supported work position before adding an active arc.
Check visibility and safe hand support. Rehearse a start and finish, not just the comfortable central section. Establish the required exposure controls, protective equipment and hot-part area. A dry rehearsal cannot teach pool control, but it can remove awkward movement that would otherwise complicate the live exercise.
Make a controlled baseline
Have the instructor select identified material, consistent preparation and a documented setup. Make a short straight bead using the prescribed movement. Record the process, consumable, configuration and coupon identifier. Note where you lost your view, changed angle or paused unexpectedly. Keep those events beside the sample rather than relying on a general impression afterwards.
Repeat the same exercise before changing the setup. Several comparable samples help distinguish an occasional slip from a repeated difficulty. Ask the instructor to review the movement and the agreed inspection result. A consistent appearance is useful information, but it does not prove all the properties required of a finished joint.
Compare travel deliberately
If the instructor chooses a speed-comparison exercise, change progress along the path while keeping the other conditions as consistent as practical. Label each sample. Record what was changed and observe the resulting bead and dimensions through the agreed method. Do not change voltage, wire speed, angles and travel together and call the result a speed test.
You can calculate average travel from distance and arc time for a practice record. For example, sixty millimetres covered in ten seconds averages 360 millimetres per minute. That arithmetic describes movement only. It is not a recommended welding speed, a measure of penetration or evidence of joint acceptability. The correct operating requirement comes from the actual procedure.
Separate the two angles
Across a symmetric equal-thickness T-joint, an introductory MIG reference commonly bisects the corner. Along the path, the selected travel inclination is a different adjustment. Identify these directions during rehearsal so that changing one does not accidentally alter the other. Use the procedure or instructor's requirements for the actual values.
Compare a supported angle exercise using otherwise equivalent coupons. Record where the torch or electrode points and what the instructor observes. Do not describe a method simply as push or pull without the process and application. Flux-cored and solid-wire arrangements can call for different movement, while an awkward joint can change access without changing its acceptance requirements.
Keep distance consistent for the process
For wire-fed welding, identify the required extension and contact-tip-to-work arrangement in the instructions. For TIG, maintain the supported tungsten position and avoid contamination. For stick, account for the shortening electrode as the bead progresses. These are separate coordination tasks even when all three involve moving along a visible line.
Practise distance during the isolated rehearsal, then observe it in a short supervised sample. If a problem appears, record whether distance drifted before it occurred. That is a useful clue, not proof of a single cause. Review preparation and setup too, rather than attributing every irregular bead to your hand.
Use simple movement before adding a weave
A straight stringer exercise provides a useful baseline. Add a weave only when it has a defined purpose within the procedure and training plan. Decorative circles can make it harder to recognise an unstable angle or inconsistent progress. The movement should serve the joint rather than imitate a pleasing video pattern.
Inspect starts, finishes and any restart separately. Keep photographs and instructor comments with the labelled samples. When the next exercise adds a joint or position, rehearse access again. A movement learned on an open flat coupon may need further supervised practice in a more restricted arrangement.
Finish with one clear objective
Choose the next lesson from a specific observation: maintain a steadier gun position, avoid running out of hand support or make progress more consistent. Return to the preparation manual if the coupons were not comparable. A useful technique notebook explains what changed and what was found. It turns repeated practice into learning without confusing a smoother-looking bead with proven quality.
Investigate a groove beside the bead
Use the MIG undercut troubleshooting lesson to record the groove's location and plan a controlled comparison. Keep the setup notes and labelled samples together before deciding on the next change.
Put the choice in context.
Try the welding process finder to narrow your equipment research, or compare a complete setup in the ownership cost calculator.
References
Open the publisher’s page. If a new tab fails, use “Open directly” or copy the address into your browser.
- Miller — MIG basics for mild steel · sourceOpens the source in a new tabmillerwelds.comLink checked · 31 Oct
- Miller — Five steps to improving stick techniqueOpens the source in a new tabmillerwelds.comLink checked · 31 Oct
- Miller — Guide to TIG welding basicsOpens the source in a new tabmillerwelds.comLink checked · 31 Oct