
In this guide
Must I remove slag before the next pass?
Yes. For a slag-forming welding process, remove the slag before depositing the next pass, including material lodged beside earlier beads. A pass is one progression of welding along a joint; several passes may build one completed weld. Cleaning belongs between those operations, rather than only at the end.
Learning objective: recognise the difference between surface slag and a slag inclusion, organise a between-pass cleaning check, and explain why appearance alone cannot establish internal soundness.
This lesson concerns supervised stick and flux-cored practice. It supplies no machine settings, acceptance limits or repair procedure. Start with the instructions for the actual consumable and joint.
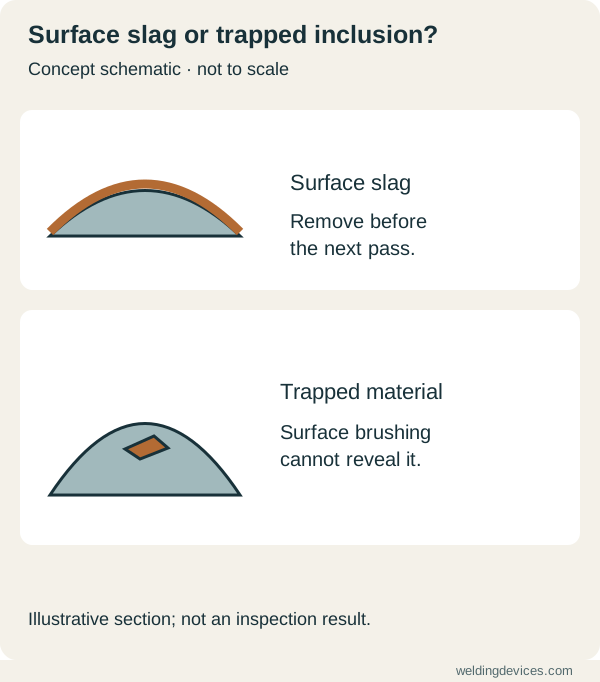
Schematic; source.
Surface slag and trapped slag are different
Slag is nonmetallic material associated with flux reactions. A layer on the surface is different from an inclusion: slag enclosed within weld metal. Lake Washington Institute of Technology's pipe-welding text explains that slag can remain between successive passes and describes radiographic identification of internal inclusions. Brushing the outside of a completed weld therefore cannot demonstrate that earlier layers are free of trapped material. See the institute's slag-inclusion chapter.
Keep the observation precise. “Dark material remains along the edge” describes something available for inspection. “The weld contains an internal slag inclusion” requires evidence beyond that observation. Photograph and label the location, then ask the instructor what examination the exercise requires.
Look for places the cleaning tool misses
TWI explains that bead placement and an uneven profile can leave pockets where slag is retained. Undercut, a groove at the weld edge, can also make cleaning difficult. A wide surface that looks brushed may still have a narrow recess containing residue. TWI recommends removing slag between runs and considering grinding where brushing or light chipping cannot achieve complete removal. It also calls for cleaning tools to be segregated for different materials. Read its technical explanation.
Before continuing, examine the edges and junctions between beads. Change your viewing position and lighting so the next bead's landing area is visible. If access prevents meaningful inspection or cleaning, stop for a review of the preparation and sequence. Do not treat another covering bead as the cleaning tool.
For the surrounding setup, use the joint preparation and inspection lesson.
Cleaning and technique need separate checks
Hobart Brothers' manufacturer education for self-shielded flux-cored welding identifies poor interpass cleaning, bead placement, travel angle and low heat input as possible contributors to slag inclusions. Its advice is scoped to that process; it does not establish one angle or voltage for every wire, position and joint. Use the actual wire instructions and approved procedure when investigating the operating setup. See Hobart Brothers' troubleshooting article.
For a practice record, separate two questions: was the previous surface properly prepared, and was the following pass deposited as instructed? Writing “more heat” beside an uncleaned sample leaves the first question unanswered. Record the consumable, pass sequence and observation before proposing a controlled change. The stick-welding practice manual provides a broader learning sequence.
A hypothetical cleaning checkpoint
Imagine an instructor has selected a multipass practice joint, a suitable consumable and its documented procedure. After the first pass, a learner brushes the broad surface. A narrow dark line remains where the bead meets one side of the preparation.
The learner pauses, labels the coupon “A, after pass one” and marks that edge on a sketch. With safe handling and the prescribed protection, the instructor checks the recess and selects an appropriate cleaning method. The learner records what was removed and asks for inspection before continuing.
If similar residue returns at the same location on a comparable coupon, the next discussion concerns access and bead placement as well as cleaning. That is an investigation plan, not a claimed test result. Neither photograph proves internal quality, and this example gives no permission to alter a production joint.
Protect your eyes during the pause
The arc stopping does not end the particle hazard. CCOHS warns that hot slag and debris can fly during cooling, chipping and grinding. It advises goggles or safety glasses with side shields even when other eye and face protection is used. Select the complete protection for the cleaning task and people nearby; follow safe hot-part handling and tool instructions. See CCOHS welding PPE guidance.
Between-pass checklist
- Identify the process, consumable and required pass sequence.
- Follow the specified cooling, handling and cleaning requirements.
- Inspect bead edges, recesses and the area the next pass will cover.
- Use suitable, material-dedicated cleaning tools.
- Stop if residue, access or the surface condition remains uncertain.
- Record the checkpoint and obtain the required inspection before continuing.
Self-check
Question: The top of a finished multipass weld brushes clean. Does that prove no slag was trapped in a previous layer?
Answer: No. Surface cleaning reveals the accessible surface. It cannot establish what is enclosed within earlier weld metal. Keep between-pass records and use the examination and acceptance requirements applicable to the actual work.
Put the choice in context.
Try the welding process finder to narrow your equipment research, or compare a complete setup in the ownership cost calculator.
References
Open the publisher’s page. If a new tab fails, use “Open directly” or copy the address into your browser.
- Lake Washington Institute of Technology — Pipe Welding: Slag Inclusions (2024) · slag-inclusion chapterOpens the source in a new tabopenwa.pressbooks.pubAutomated check blocked · 31 Oct
- CCOHS — Welding PPE (revised 15 October 2025) · CCOHS welding PPE guidanceOpens the source in a new tabccohs.caLink checked · 31 Oct