
In this guide
Why does my TIG bead end in a hollow?
A hollow at the stop can form as the last molten weld pool shrinks while solidifying. Ending the arc abruptly, or withdrawing filler too early, can leave the termination inadequately filled. Plan the finish as part of the bead: follow the selected procedure for reducing current and adding filler, then inspect the stop. TWI explains this shrinkage mechanism in its crater-pipe guidance.
Learning objective: distinguish an end crater, a crater pipe and a suspected crater crack, and plan a supervised finishing exercise without guessing a universal timer or current.
This is a troubleshooting lesson for identified practice material. It does not establish acceptance limits or a repair method for a working component.
Separate the depression from a crack
Here, an end crater means the depression left where welding stops. A crater pipe is a shrinkage cavity associated with the final pool solidifying; TWI notes that gas porosity can accompany it. A depression, cavity and crack are therefore observations to distinguish, rather than interchangeable names.
A crater crack is a fracture at the termination. AWS describes these as hot cracks associated with incorrect arc termination; they may have a star-like pattern and can initiate longer cracks. Read its crater-crack explanation. The small size of a mark is not a reason to dismiss it.
Use descriptive notes: “hollow stop,” “small central opening” or “fine branching line.” Avoid diagnosing the crack mechanism from a quick glance. Clean and inspect as required by the exercise, and ask for competent assessment if a line remains uncertain.
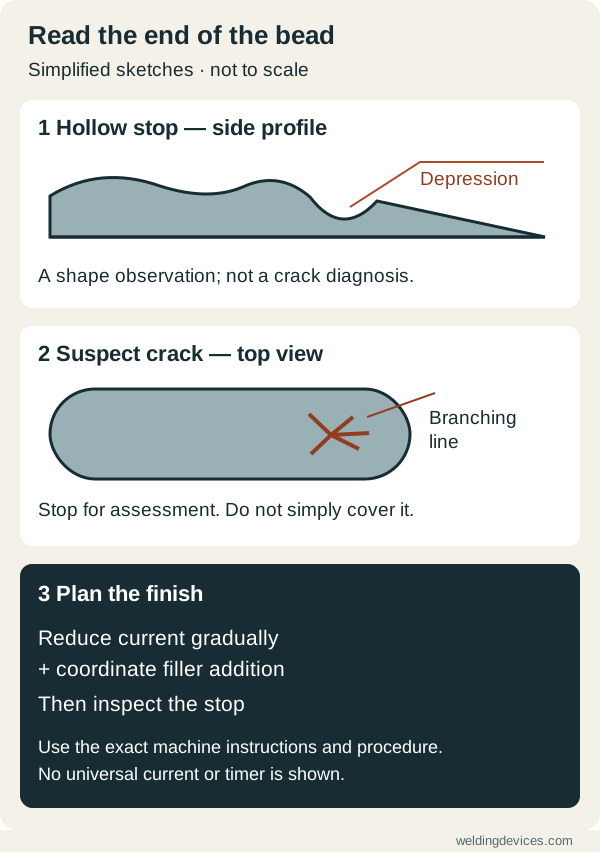
Schematic, not to scale: compare the views, then follow the finishing sequence. Based on TWI's crater guidance, AWS crack descriptions and Miller's TIG finishing guidance.
Coordinate the current and filler at the finish
Miller's manufacturer education identifies abrupt power reduction and removing the filler rod too soon as common TIG finishing problems. It recommends reducing current gradually while continuing filler addition. It also describes crater-control features on equipped TIG machines. See the Miller crater section.
That explains the coordination objective; it supplies no setting for your particular machine. Check how its trigger, pedal or programmed sequence actually ends the arc. Establish which control changes current, whether a downslope is available, and how the operator is expected to supply filler during the selected finish.
A downslope is the controlled reduction of welding current toward the end of the operation. Its available range and interaction with the controls belong to the exact equipment instructions. Do not copy a finishing time from a different machine or treat the presence of a crater-control menu as proof that the resulting weld is acceptable.
Use the TIG practice manual for the broader coordination exercise.
Investigate more than the final hand movement
A better stop does not resolve every possible cracking cause. TWI explains solidification cracking as failure of the nearly solidified weld metal to withstand contraction stresses. It identifies bead shape, restraint and material characteristics among the contributing factors. Its guidance includes adequately filling the stop rather than leaving an unfavourable concave shape. See TWI on solidification cracking.
For a training discussion, bring the material and filler identification, joint sketch, fit-up observations and finishing sequence. If cracking is suspected, stop and seek assessment rather than repeatedly covering the mark. AWS explains why welding over an unremoved crack is not a repair.
Keep the original observation available. A photograph before further work, alongside the labelled coupon, gives the instructor more information than a description of how the surface looked after grinding.
A hypothetical finishing comparison
Imagine an instructor selects two comparable TIG practice coupons, the appropriate filler and a documented setup. On coupon A, the learner records that filler addition ended before the planned current reduction was complete. After safe cooling and the required preparation, the stop shows a hollow.
Before coupon B, the learner rehearses the finish with the equipment safely isolated according to its instructions. The instructor checks hand access and explains the prescribed coordination. The learner then follows that sequence and records the stop separately from the middle of the bead.
Compare the labelled observations and the instructor's inspection findings. This example predicts no result: coupon B is not automatically sound because the sequence was followed. If either sample shows a suspicious line, the next step is assessment, not a claim that one control adjustment has cured cracking.
Finishing checklist
- Confirm the exact machine controls, material, filler and selected procedure.
- Rehearse comfortable access to the end of the joint.
- Coordinate filler addition and current reduction as instructed.
- Complete the required shielding and safe hot-part handling sequence.
- Inspect the termination separately from the uninterrupted bead.
- Record hollows, openings or suspect lines; stop for review when uncertain.
For the separate gas-timing question, read the TIG post-flow lesson.
Self-check
Question: A machine has crater control. Does that prove every termination it produces is crack-free?
Answer: No. The feature assists the finishing sequence. Actual setup, filler coordination, material, joint conditions and inspection still matter. A neat-looking stop cannot certify the whole weld or replace the examination required for the work.
Put the choice in context.
Try the welding process finder to narrow your equipment research, or compare a complete setup in the ownership cost calculator.
References
Open the publisher’s page. If a new tab fails, use “Open directly” or copy the address into your browser.